So, I took on the task of testing my friend's file upload site. You can find that site here. It's a tool that allows you to upload a file and you will get a popup alerting you the file size in bytes.
When you go to a website and click something that allows you to upload a file, typically you'll get a GUI interface that interacts with your system to retrieve a file for you. However, requires a different set of tools because this means you now have to interact with your system rather than the browser. Luckily, Capybara has a wonderful method: attach_file. This method is simply amazing because it takes two arguments: the button style identifier you want to press that opens the system to attach a file and the file's path. Amazing. The method while in action would look like this:
attach_file("the-file" , 'file path')
So I ran this through cucumber and the test is well-designed, except I didn't know how switch Capybara from testing the browser to a popup window. Its really simple! Give your driver variable the method the "switch_to_alert" and Capybara will look at popups (officially know as alerts).
This shows how powerful a tool Capybara is. I feel like I'm practically speaking English to the computer and getting the computer to do amazing stuff for me.

Capybara. Can it be that simple?
So, a lot of the testing groups and employers keep telling me "you need to learn Capybara and Rspec to go with your Cucumber!" After fiddling with Capybara, I can tell you why. It makes a lot of test automation about ten times easier and the software is very intelligent.
Before I used Selenium-Webdriver to navigate to different pages, click on buttons, and identified things with HMTL and CSS tags. However, what if I could simply identify something by the text a link is displaying? What if I could just write visit(page) into ruby and it visits the page for me? Things would be much simpler and there would be far less chance of error. Also, I could write my scripts much faster! In this post, I want to concentrate on rewriting the same methods in my TrekToday automated test in Capybara.
In our Given Statement, we told Selenium Webdriver to navigate to a page using the "navigate.to" method. How do we do that in Capybara? Simple: visit(page), where page is the place you want to go to. Now, does that mean Capybara replaces SWD? Not exactly. It's actually using SWD methods to build something a little more intelligent. How do I know? Its in the gem's documentation:

Here you can see that Capybara's visit method is defined using SWD methods. Which is really cool, but also makes this kinda like mathematics. Calculus is good for a lot of things, but you have to understand algebra before you truly understand what's going on. In order to find the code I just found with any gem, go to the Rubydoc page for that gem, find the method, and hit "view source." This really opened up my world! Back to the task at hand:
So now we can visit the page and we have to resize it. Remember Capybara is still using SWD. This is a little more extraneous with Capybara, but you simply assign "Capybara.current_session.driver.browser.manage.window" to the variable window then use the .resize_to(x,y) method on the window variable.
Where this become really easy is the when and then statements. Before we told the driver to find a CSS ID which locates a button and then asked the computer to click it for us. This then took us to the CSI Files site. However with Capybara all we have to do is tell the computer to click the button via the actual text on the button. One thing to remember in this case is to still inspect the element and check out the actual text. Sometimes some fonts are all uppercase no matter what case is input. So the link text for us is "CSI Files" and we can use the "click_link('CSI Files')" method to click the button. Now that we're on the CSI Files site, I want to use the CSI Files logo to see if we have correctly navigated to the site. All I have to do with Capybara is say page.has_content?('CSI FILES'). This really makes our code simpler to read. Here's the final code, so it's a little easier to understand what I did.

Before I used Selenium-Webdriver to navigate to different pages, click on buttons, and identified things with HMTL and CSS tags. However, what if I could simply identify something by the text a link is displaying? What if I could just write visit(page) into ruby and it visits the page for me? Things would be much simpler and there would be far less chance of error. Also, I could write my scripts much faster! In this post, I want to concentrate on rewriting the same methods in my TrekToday automated test in Capybara.
In our Given Statement, we told Selenium Webdriver to navigate to a page using the "navigate.to" method. How do we do that in Capybara? Simple: visit(page), where page is the place you want to go to. Now, does that mean Capybara replaces SWD? Not exactly. It's actually using SWD methods to build something a little more intelligent. How do I know? Its in the gem's documentation:

Here you can see that Capybara's visit method is defined using SWD methods. Which is really cool, but also makes this kinda like mathematics. Calculus is good for a lot of things, but you have to understand algebra before you truly understand what's going on. In order to find the code I just found with any gem, go to the Rubydoc page for that gem, find the method, and hit "view source." This really opened up my world! Back to the task at hand:
So now we can visit the page and we have to resize it. Remember Capybara is still using SWD. This is a little more extraneous with Capybara, but you simply assign "Capybara.current_session.driver.browser.manage.window" to the variable window then use the .resize_to(x,y) method on the window variable.
Where this become really easy is the when and then statements. Before we told the driver to find a CSS ID which locates a button and then asked the computer to click it for us. This then took us to the CSI Files site. However with Capybara all we have to do is tell the computer to click the button via the actual text on the button. One thing to remember in this case is to still inspect the element and check out the actual text. Sometimes some fonts are all uppercase no matter what case is input. So the link text for us is "CSI Files" and we can use the "click_link('CSI Files')" method to click the button. Now that we're on the CSI Files site, I want to use the CSI Files logo to see if we have correctly navigated to the site. All I have to do with Capybara is say page.has_content?('CSI FILES'). This really makes our code simpler to read. Here's the final code, so it's a little easier to understand what I did.

Learning Cucumber: Step Definitions Part Two (The Coding)
So referring to my last post, I showed you the output of running a feature file through Cucumber. It's pretty neat! You actually get a shell of code in which we can begin to work. This makes our workflow really efficient. Now, for this we need to stick with tools we know. Later on, I'll be blogging about Capybara, but for now let's work with Selenium-Webdriver, which we used in a previous blog post.
If you haven't already, create a directory called "step_definitions" and create a ruby file. Copy and paste the code from the Cucumber output into your ruby file. It should look like this:
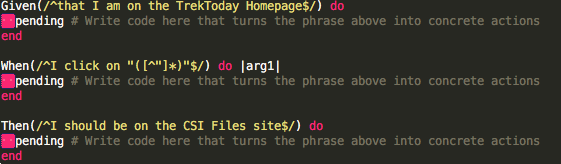
Now, to understand what's going on, you have to fiddle with regular expressions a little bit. I highly recommend http://regexr.com/. Ruby uses regular expressions to communicate with the .feature file and Cucumber writes them out for us whenever we write out Gherkin and run Cucumber. Using Selenium WebDriver, let's visit the webpage, click the CSI Files Button and see if it takes us to the site! I've done something extremely similar to this in a former post. We require SWD (Selenium-Webdriver), assign "Selenium::WebDriver.for :firefox" to the variable 'driver' and use the 'navigate.to' method to go to the site. I'm going to help those of you who use this from a silly error. The WebDriver will actually open most pages in the mobile resolution making our test a little more difficult, so we need to use SWD's maximize window method. We will write out our code and paste it where it says "pending." Our code should look like this:
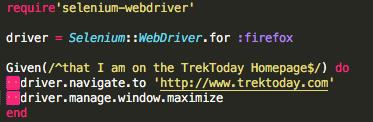
Now we can run Cucumber and see what happens! Our webdriver script took us to the page and maximized the window. This sets up our "given" part of Cucumber. Essentially we're saying "we're on the webpage, now we can do stuff." Our terminal should give us this output:
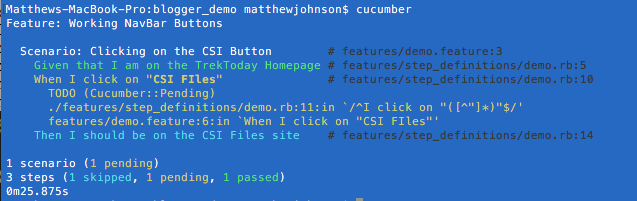
Now we can see the other statuses of Gherkin features. We have the Ruby code written out and nothing shows as undefined. We have properly written executable code that takes us to the TrekToday Homepage as our "given." This shows as "passed" because it did what it was supposed to do, no problems. The next step shows as "pending" because of the pending statement in our code. This means we have defined our test, but do not have code for it yet. The last step shows as "skipped" due to the way Cucumber has to work: We check the given, then when, and then then statement and in that order only. We didn't pass on our when step, so we can't even look at the then step yet. Without repeating what I did in my Selenium-Webdriver tutorial, I'll just post the code here that gets us to the site and show you the results of a fully passed test.
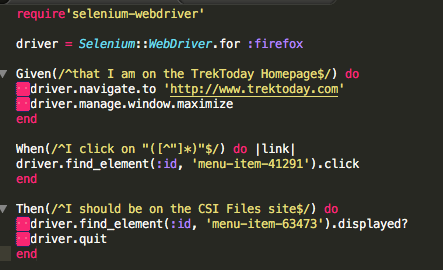 When I run cucumber on this, the webdriver opens TrekToday, maxes out the page size, looks for the CSI Files button using a CSS ID, clicks the button and scans the page for a specific CSS ID that identifies we're the CSI Files site. Now we know this code does this correctly and so we should see that all the tests passed.
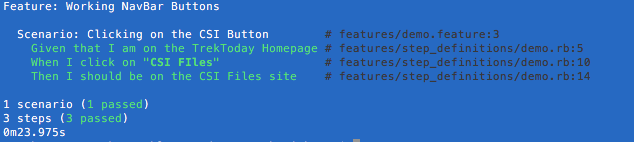
And that's what we get. We can see the great importance of this tool. It brings everyone together and makes testing much more efficient. Much, much more efficient. I can now write an automated test in a matter of minutes. More importantly, I can show someone who doesn't know code my instruction set in plain english. They know exactly what I'm doing and that means better collaboration which also means better software.
If you haven't already, create a directory called "step_definitions" and create a ruby file. Copy and paste the code from the Cucumber output into your ruby file. It should look like this:

Now, to understand what's going on, you have to fiddle with regular expressions a little bit. I highly recommend http://regexr.com/. Ruby uses regular expressions to communicate with the .feature file and Cucumber writes them out for us whenever we write out Gherkin and run Cucumber. Using Selenium WebDriver, let's visit the webpage, click the CSI Files Button and see if it takes us to the site! I've done something extremely similar to this in a former post. We require SWD (Selenium-Webdriver), assign "Selenium::WebDriver.for :firefox" to the variable 'driver' and use the 'navigate.to' method to go to the site. I'm going to help those of you who use this from a silly error. The WebDriver will actually open most pages in the mobile resolution making our test a little more difficult, so we need to use SWD's maximize window method. We will write out our code and paste it where it says "pending." Our code should look like this:

Now we can run Cucumber and see what happens! Our webdriver script took us to the page and maximized the window. This sets up our "given" part of Cucumber. Essentially we're saying "we're on the webpage, now we can do stuff." Our terminal should give us this output:

Now we can see the other statuses of Gherkin features. We have the Ruby code written out and nothing shows as undefined. We have properly written executable code that takes us to the TrekToday Homepage as our "given." This shows as "passed" because it did what it was supposed to do, no problems. The next step shows as "pending" because of the pending statement in our code. This means we have defined our test, but do not have code for it yet. The last step shows as "skipped" due to the way Cucumber has to work: We check the given, then when, and then then statement and in that order only. We didn't pass on our when step, so we can't even look at the then step yet. Without repeating what I did in my Selenium-Webdriver tutorial, I'll just post the code here that gets us to the site and show you the results of a fully passed test.
 When I run cucumber on this, the webdriver opens TrekToday, maxes out the page size, looks for the CSI Files button using a CSS ID, clicks the button and scans the page for a specific CSS ID that identifies we're the CSI Files site. Now we know this code does this correctly and so we should see that all the tests passed.
And that's what we get. We can see the great importance of this tool. It brings everyone together and makes testing much more efficient. Much, much more efficient. I can now write an automated test in a matter of minutes. More importantly, I can show someone who doesn't know code my instruction set in plain english. They know exactly what I'm doing and that means better collaboration which also means better software.
Learning Cucumber: Step Definitions Part 1 (The Setup)
So Cucumber's Gherkin language is awesome. We can very simply write out a feature with plain english. And one rule I've learned with cucumber the simpler the better. What's really cool about Cucumber is that you can run tests based off the features you have made in plain English! How do you do that? Well, you write code that backs up the plain english instructions Gherkin instructions.
When you run Cucumber, you run it "above" the features file by typing the word "cucumber." The features file will contain, when we're all done, a plain english Gherkin file denoted with the extension .feature. Then next to that you will have a folder labeled "step_definitions." Step definitions are the codes that give Gherkin features meaning to a computer. These will have a ".rb" extension are written in ruby. This all makes sense when you start to run each step in the terminal, so let's do just that. Create a folder and name it whatever you want. I created a folder called "blogger_demo." Inside that folder type "mkdir features" into your folder. Now simply type "cucumber."

This is exactly what we wanted. The features file has nothing in it, so Cucumber is reading that there are no scenarios and no steps to even run this command on. So, let's choose a site (I'm using TrekToday.com) and see what features it may have that we can use to run a small test. Trek Today is awesome for Trekkers like me and has a handy navigation bar that I could use to check out all kinds of cool stuff that isn't just Star Trek, but also CSI Files and other CBS television treasures.
What I want to do is see if Trek Today's CSI Files button works. Now as a Cucumber newbie, I decided it is best to do a manual test to see what the button actually does. It takes us to another site, CSI Files, which is similar in format to Trek Today. So let's create a file called "navbar_buttons.feature" and write out our Gherkin. I should be able to press the CSI Files button on the navbar and be taken to the CSI Files site. In Gherkin that is said even more simply:

Now that this is written out in Gherkin the computer does have something it can read. However that doesn't mean that the computer is going to carry out instructions that you have. To understand this a little better type "cucumber" into your terminal.

So our computer has read our Gherkin file and determined that there are three steps: a given, when and then step. However, the computer can't do anything with that and therefore the tests are undefined. A lot of our work is cut out for us. If you copy from the Given all the way down to the last "end" statement and paste it into a ".rb" file, you have a lot of the coding work done for you. All we have to do is add the executable code into the file. However that is best explained in Part 2.
When you run Cucumber, you run it "above" the features file by typing the word "cucumber." The features file will contain, when we're all done, a plain english Gherkin file denoted with the extension .feature. Then next to that you will have a folder labeled "step_definitions." Step definitions are the codes that give Gherkin features meaning to a computer. These will have a ".rb" extension are written in ruby. This all makes sense when you start to run each step in the terminal, so let's do just that. Create a folder and name it whatever you want. I created a folder called "blogger_demo." Inside that folder type "mkdir features" into your folder. Now simply type "cucumber."

This is exactly what we wanted. The features file has nothing in it, so Cucumber is reading that there are no scenarios and no steps to even run this command on. So, let's choose a site (I'm using TrekToday.com) and see what features it may have that we can use to run a small test. Trek Today is awesome for Trekkers like me and has a handy navigation bar that I could use to check out all kinds of cool stuff that isn't just Star Trek, but also CSI Files and other CBS television treasures.

What I want to do is see if Trek Today's CSI Files button works. Now as a Cucumber newbie, I decided it is best to do a manual test to see what the button actually does. It takes us to another site, CSI Files, which is similar in format to Trek Today. So let's create a file called "navbar_buttons.feature" and write out our Gherkin. I should be able to press the CSI Files button on the navbar and be taken to the CSI Files site. In Gherkin that is said even more simply:

Now that this is written out in Gherkin the computer does have something it can read. However that doesn't mean that the computer is going to carry out instructions that you have. To understand this a little better type "cucumber" into your terminal.

So our computer has read our Gherkin file and determined that there are three steps: a given, when and then step. However, the computer can't do anything with that and therefore the tests are undefined. A lot of our work is cut out for us. If you copy from the Given all the way down to the last "end" statement and paste it into a ".rb" file, you have a lot of the coding work done for you. All we have to do is add the executable code into the file. However that is best explained in Part 2.
Bringing People Together with Cucumber
So as a newbie trying to enter into the QA world, I've consistently heard "you've gotta know Cucumber!" What in the world is that? Well, firstly it is a skill that is in very high demand and for a very good reason. Cucumber is a testing framework driven by plain english and it serves to aid testing, documentation, and development. Simply put, it streamlines a company's workflow meaning: faster releases, more releases, better testing, and better development.
To me, of course, this is all theoretical. However, I have had to do technical work before (accounting and operations metrics) and serve managers, who to put it lightly, didn't understand anything I was doing. What happens is unrealistic deadlines and friction between the management expert and the expert of another field. I've even had a job where we lost tens of thousands of dollars in productivity waste. Now I can imagine what the problems could be between a programmer and a person whose expertise is something else. Cucumber reduces this problem as well using a wonderful little language known as Gherkin (which in English is a baby Cucumber).
How does it do that? Well this is better explained by examples. I'll give credit to this example to the Cucumber Book, the resource I am currently working through. Let's imagine that testsite.com is an online retailer. My friend goes to testsite and she wants to buy some camping equipment. She goes and enters her credit card information, but instead of entering 16 digits, she enters 15 by accident. Now, we could just spit something back out that says "transaction error," but that isn't user friendly and people would get frustrated with our site and we would go bankrupt. We want to give the user something that will give an error message specifying what they did wrong, so they can fix it easily.
This something is commonly referred to a feature and luckily enough, it is called a feature in Gherkin. Features are the basic units of Cucumber. Features are items that address multiple scenarios described by the given, when, then syntax. Most importantly, the first step of this is written in plain english! There are also some other keywords that may help us like "but," "and," as well as a small list of other. So breaking it down:
To me, of course, this is all theoretical. However, I have had to do technical work before (accounting and operations metrics) and serve managers, who to put it lightly, didn't understand anything I was doing. What happens is unrealistic deadlines and friction between the management expert and the expert of another field. I've even had a job where we lost tens of thousands of dollars in productivity waste. Now I can imagine what the problems could be between a programmer and a person whose expertise is something else. Cucumber reduces this problem as well using a wonderful little language known as Gherkin (which in English is a baby Cucumber).
How does it do that? Well this is better explained by examples. I'll give credit to this example to the Cucumber Book, the resource I am currently working through. Let's imagine that testsite.com is an online retailer. My friend goes to testsite and she wants to buy some camping equipment. She goes and enters her credit card information, but instead of entering 16 digits, she enters 15 by accident. Now, we could just spit something back out that says "transaction error," but that isn't user friendly and people would get frustrated with our site and we would go bankrupt. We want to give the user something that will give an error message specifying what they did wrong, so they can fix it easily.
This something is commonly referred to a feature and luckily enough, it is called a feature in Gherkin. Features are the basic units of Cucumber. Features are items that address multiple scenarios described by the given, when, then syntax. Most importantly, the first step of this is written in plain english! There are also some other keywords that may help us like "but," "and," as well as a small list of other. So breaking it down:
- We want a feature that tell us what went wrong when we enter incorrect card details
- We want them to address different scenarios
For the sake of brevity, I'll do the one aforementioned scenario. My friend enters 15 digits and should get an error message. This is simply a scenario, but the feature will address multiple problems. The Feature will address a card that is expired, stolen, all kinds of other things. The scenario addresses a single case where something would go wrong. So how do we write this in Gherkin? It's rather intuitive:
Here's a blank example:
Feature:
Scenario
Given I am someone (you can add some place at some time)
When I do something
Then I expect this result
Ok so this is rather blank, how does that translate to our problem? Like so:
Feature: Feedback when entering invalid card information
Here's a blank example:
Feature:
Scenario
Given I am someone (you can add some place at some time)
When I do something
Then I expect this result
Ok so this is rather blank, how does that translate to our problem? Like so:
Feature: Feedback when entering invalid card information
Background:
Given I have chosen some items to buy
And I have entered my card details
Scenario: Credit card number too short
When I enter a card number that's only 15 digits long
And all the other details are correct
And I submit the form
Then the form should be redisplayed
And I should see a message advising me of the correct number of digits
Here Feature and Background apply to multiple scenarios. This one scenario addresses my friend's problem. However, what is really cool about this is that everything typed above goes into a .feature folder. This plain english language can be backed up by code, which in our case is a Ruby script. This means that cucumber is both a helpful tool to those who code and serves as a meeting table between the coder and the "layman."
Here Feature and Background apply to multiple scenarios. This one scenario addresses my friend's problem. However, what is really cool about this is that everything typed above goes into a .feature folder. This plain english language can be backed up by code, which in our case is a Ruby script. This means that cucumber is both a helpful tool to those who code and serves as a meeting table between the coder and the "layman."
Using Selenium-Webdriver to have the surfing done for you
So now that we have functions for scraping data from sites, let's imagine we had to do it for a whole bunch of site. In the case of webpagetest.org, simply putting this in any array won't work. Whenever you go to webpagetest.org, you're entering a URL that, when submitted, changes the path of the webpage. So you start on webpagetest.org, but entering in your site changes the URL from "http://www.webpagetest.org" to "http://www.webpagetest.org/result." This means in order to do a simple automation of our test, we need to have something do the web surfing for us. Before that, however, I have to make a confession: if you use this test to do an large amount of testing, as I did, you're not being a good web citizen. Ensure that you only do this for a small batch of URL's (like 100 at the MOST). Ask for an API. Be wise, unlike myself.
Anyways, there is a tool to do our aforementioned task. Its called Selenium-Webdriver and it made me giggle the first time I used it! There are some awesome and surprisingly intuitive methods with this gem. First to start off this program, you'll have to require the gem. Now let's say we wanted to create a real simple demo program that opened up the browser, navigated to google, and search google for a something (I'm picking Star Trek Beyond Trailers). That's relatively simple and we can draw on some skills we learned from Nokogiri.
The only way a computer is going to know what a google search bar is, is through code. For us, that means HTML and CSS id's. To find these, we right click and click inspect elements. Luckily most element inspectors make finding elements in code easy. For the google search bar the HTML ID is "gs_lc0." Now for the code:

Firstly, we call on Selenium-Webdriver and this takes an argument for which browser you'll be using. So far, I've only tried this on Firefox and Chrome. Using Firefox is extremely easy, so I'd recommend that. Next you're going to want to go to google. The ".navigate.to" method does just that, it navigates to a page. Now, we want to do something to the page, namely enter a value into the google search bar and submit it to search. As mentioned earlier, the google search bar id is "gs_lc0." The find_element method finds the element with your two given arguments. Using ID is the most specific as each ID is unique to the item, "gs_lc0" will only be used for the search bar.
So now your computer has identified the search bar, what do we do? The same things we do as human beings, we just don't really think about it! We click on the search bar, type some stuff, and click or press enter. We just have to tell Selenium_Webdriver to do that now. For this, we use ".click" which prompts the search bar with a click. Then we type something out with the "send_keys" method which takes a string value argument. Finally we wrap it up with ."submit," which is our enter key, making Google search for us Star Trek Beyond Trailers. Which surely to be a great movie!
Anyways, there is a tool to do our aforementioned task. Its called Selenium-Webdriver and it made me giggle the first time I used it! There are some awesome and surprisingly intuitive methods with this gem. First to start off this program, you'll have to require the gem. Now let's say we wanted to create a real simple demo program that opened up the browser, navigated to google, and search google for a something (I'm picking Star Trek Beyond Trailers). That's relatively simple and we can draw on some skills we learned from Nokogiri.
The only way a computer is going to know what a google search bar is, is through code. For us, that means HTML and CSS id's. To find these, we right click and click inspect elements. Luckily most element inspectors make finding elements in code easy. For the google search bar the HTML ID is "gs_lc0." Now for the code:

Firstly, we call on Selenium-Webdriver and this takes an argument for which browser you'll be using. So far, I've only tried this on Firefox and Chrome. Using Firefox is extremely easy, so I'd recommend that. Next you're going to want to go to google. The ".navigate.to" method does just that, it navigates to a page. Now, we want to do something to the page, namely enter a value into the google search bar and submit it to search. As mentioned earlier, the google search bar id is "gs_lc0." The find_element method finds the element with your two given arguments. Using ID is the most specific as each ID is unique to the item, "gs_lc0" will only be used for the search bar.
So now your computer has identified the search bar, what do we do? The same things we do as human beings, we just don't really think about it! We click on the search bar, type some stuff, and click or press enter. We just have to tell Selenium_Webdriver to do that now. For this, we use ".click" which prompts the search bar with a click. Then we type something out with the "send_keys" method which takes a string value argument. Finally we wrap it up with ."submit," which is our enter key, making Google search for us Star Trek Beyond Trailers. Which surely to be a great movie!
Data Scraping with Nokogiri
Imagine that while working for testsite, you are asked to create an automated test that will audit one of our page's performance metrics. After a bunch of research, you find that your best bet for gathering website performance metrics is from a handy website called: webpagetest.org. Check it out, you can enter any URL and get all kinds of data about said site's performance without a whole lot of time spent.
In order to complete this project, we need two things:


In order to complete this project, we need two things:
- Something that takes the performance data printed out on the site and turns into something you can manipulate. This process is called "data scraping" and it is what this blog post is all about!
- Something, which I will cover later, that navigates to the site for us, inputs the data for us, and runs the test for us.
Luckily Ruby has an awesome gem called Nokogiri, which turns a website into a Ruby object. Let me show you a manual way of testing a webpage. I'm a Star Trek fan, so I'm going to test "http://www.trektoday.com." I enter my URL and then I'll get a nice chart with all kinds of useful data like so:

Let's say I wanted to get that first value "14.630s," in the "Load Time" column and "First View" row. How in the world would you do that? You have to delve into the front-end coding languages of the website: HTML and CSS. HTML shows us the plain text of the site and CSS shows us the style. HTML and CSS often times have specific identifiers that let us know what each text is. Since we're scraping a very specific data we have to use a very specific identifier for Nokogiri: 'id.' In HTML and CSS 'id' is specific to one thing and one thing only. It can't be used anywhere else. So how do we get "14.630s" id?
First highlight "14.630s" and right click. In Google Chrome, you'll see an option "inspect." This opens up the HTML and CSS we'll use to scrape our data. One nice thing is that the exact element for "14.630s" should already be highlighted for us! Here's what it will look like:

We now have an important CSS 'id' which equals "fvLoadTime" and this gives us the "14.630s" we're looking for. Now we can write our code. We need to require 'open-uri' as well as 'nokogiri' since we will be working with URL's.
Now we can define the page we'll be using to scrape data from, which will be the results page (not simply webpagetest.org). We'll call on Nokogiri and its HTML library and assign it to a variable to make it easier to use for future use. Nokogiri has the method ".at_css" which accesses our specific HTML id. The above code yields these results:

The first result simply spits out the HTML code we pulled our data from. The second result will (though it did not in the case) pull out any input text between the <td></td> tags (meaning we will \n's as well as the text we want). By adding .strip to data.at_css('fvLoadTime').text, we actually are able to get just the data we want. Our function has returned to us a string which will be extremely useful to us. Instead of copying and pasting all of our data to some document, we now have Ruby strings results we can work with. Now to automate the actions in the browsers! Stay tuned!
Subscribe to:
Posts (Atom)